Setting up the green screen processing
Note
If the speaker has not been recorded in front of a green screen, you can skip this section.
The configuration for processing the green screen recording can be done at any time of the video editing. It does not depend on the synchronization of the source files, the cutting or the marking of the slide transitions.
In order to configure the green screen processing, switch to one of the Greenscreen scenes. If the recording of the speaker is split to multiple files, the processing of each file has to be done individually, and has therefore its own Greenscreen scene. Also, switch to the Compositing workspace.
If you did not do any of the processing steps before, the compositing workspace may be empty. In this case, execute the setup command again.
>>> automation.setup()
Explanation of the view
The main area of the Compositing workspace contains a network of boxes, which describe how the processing has to be done. A preview image of the processed video is in the background of these boxes.
Play around with the parameters of the Split Viewer box. You will notice, that it lets you switch, which parts of the preview image shall be displayed as the processing result and which shall display a black and white mask, that visualizes, what the processing considers to be the background, that shall be erased. The processed video is of course helpful to check, how the processed video of the speaker will look in the end. But in the mask, it is often easier to detect issues with the green screen processing. So make sure to check your settings with both visualizations.
The Split Viewer box is only for the preview, while final result is configured in the Composite box (which does not need any extra configuration). So the preview and the result are independent and the settings of the Split View box do not affect the final rendering.
Other boxes, that do not need to be configured are the Movie Clip box, which loads the recording from the video file and the Alpha Convert box, which does a necessary color space transformation. The remaining two boxes are discussed in the following subsections.
Note, that below the area with the processing boxes, there is a Dope Sheet, which is similar to the sequencer, as you can move around the blue cursor to select different points in time in the video. It is highly recommended to double-check each of the settings, that are discussed below, at different points in the video.
Compensating the distortions due to the camera position
With most recordings, you can skip this step and leave the Lens Distortion box untouched. However, sometimes, an unfortunate positioning of the camera can lead to a distorted image of the speaker. For example, if the camera is too close to the speaker, the extreme wide angle of the camera lens give the video almost a fish-eye like perspective, that makes objects in the center of the image appear disproportionally large. Another issue, that might require compensation is, when the camera was filming the speaker from below, so that their head appears unusually small in comparison to the torso.
For compensating the distortion, the processing of the greenscreen video offers two boxes. The first one is called Corner Pin and allows to change the position of the input video’s corners in the output video. There are three parameters for each of the corners, where the first is the x-axis position along the width of the video, the second is the y-axis position along the height of the video and the third parameter is ignored. The intended use for this processing box is to move either the upper or the lower corners a little bit inside to compensate for a camera position, that filmed the speaker either from above or from below. The required adjustments are usually very small. In one example, where the speaker was filmed from below by a camera, that was sitting on the speaker’s desk, the compensated x-coordinates for the lower corners were 0.03 and 0.97 respectively.
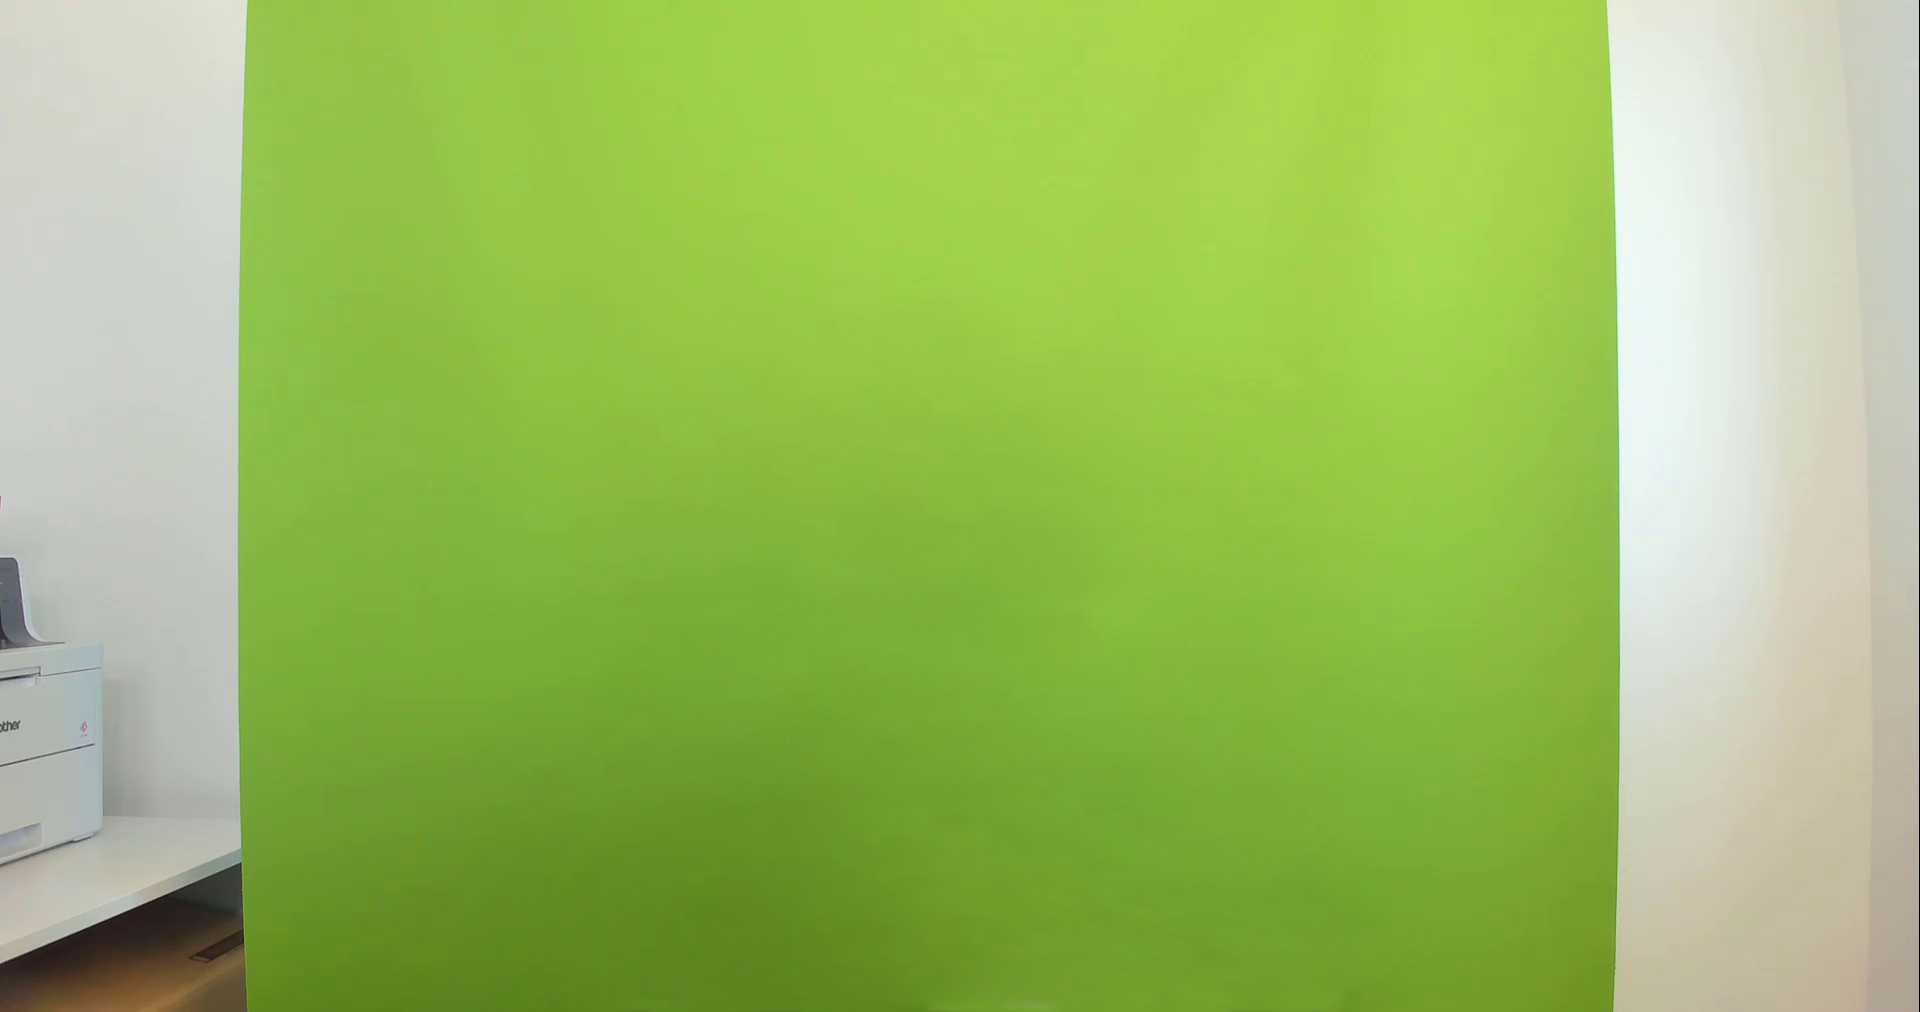
The second box for equalizing a distorted image is the Lens Distortion box. The most important parameter here is the Distort parameter, which allows to specify a radial distortion of the image. In videos, where the camera is placed in close proximity to the speaker, the wide angle of the camera lens creates a barrel distortion, which expands the objects in the center of the image, while the content in the edges is being compressed. Such a distortion can be compensated with a negative value for the Distort parameter. Again, the requred adjustments are usually tiny. The following image shows a green screen rollup, whose edges appear bent because of the camera’s barrel distortion. Note, how the edge of the room in the right side appears even more bent. The value for the Distort parameter, which compensates this clearly visible distortion, is only -0.018.
Configuring the color keying
This subsection describes the settings in the Keying box, which is responsible for detecting and removing the green screen background.
Note
The following approach for setting up the green screen processing is by no means the only one. You can find many other tutorials on this in the internet and all of them can be applied here, as Blender.LectureEdit does not require any special configuration for this processing step.
First, you should select a color, that shall be considered as background and subsequently erased from the video by the color keying. For that, click on the color field next to the label Key Color and then use the pipette to pick a point in the video, that is representative of the green screen’s color. Pick a point on the green screen near the speaker. If there are wrinkles in the green screen, so that some areas are darker than others, the general recommendation is to sample the color in a darker area.
After configuring the correct color, the preview of the result should already look very similar to what you want to have. If there are still large areas of the green screen background visible near the speaker, reset the Key Color setting to white and then sample the green screen color at a different point. You can also sample the color at a different frame in the video.
The following screenshot shows a common issue when picking the color at one frame and then moving to a different one. In the mask, you can see that a large area on the left side is not recognised properly as the green screen background.
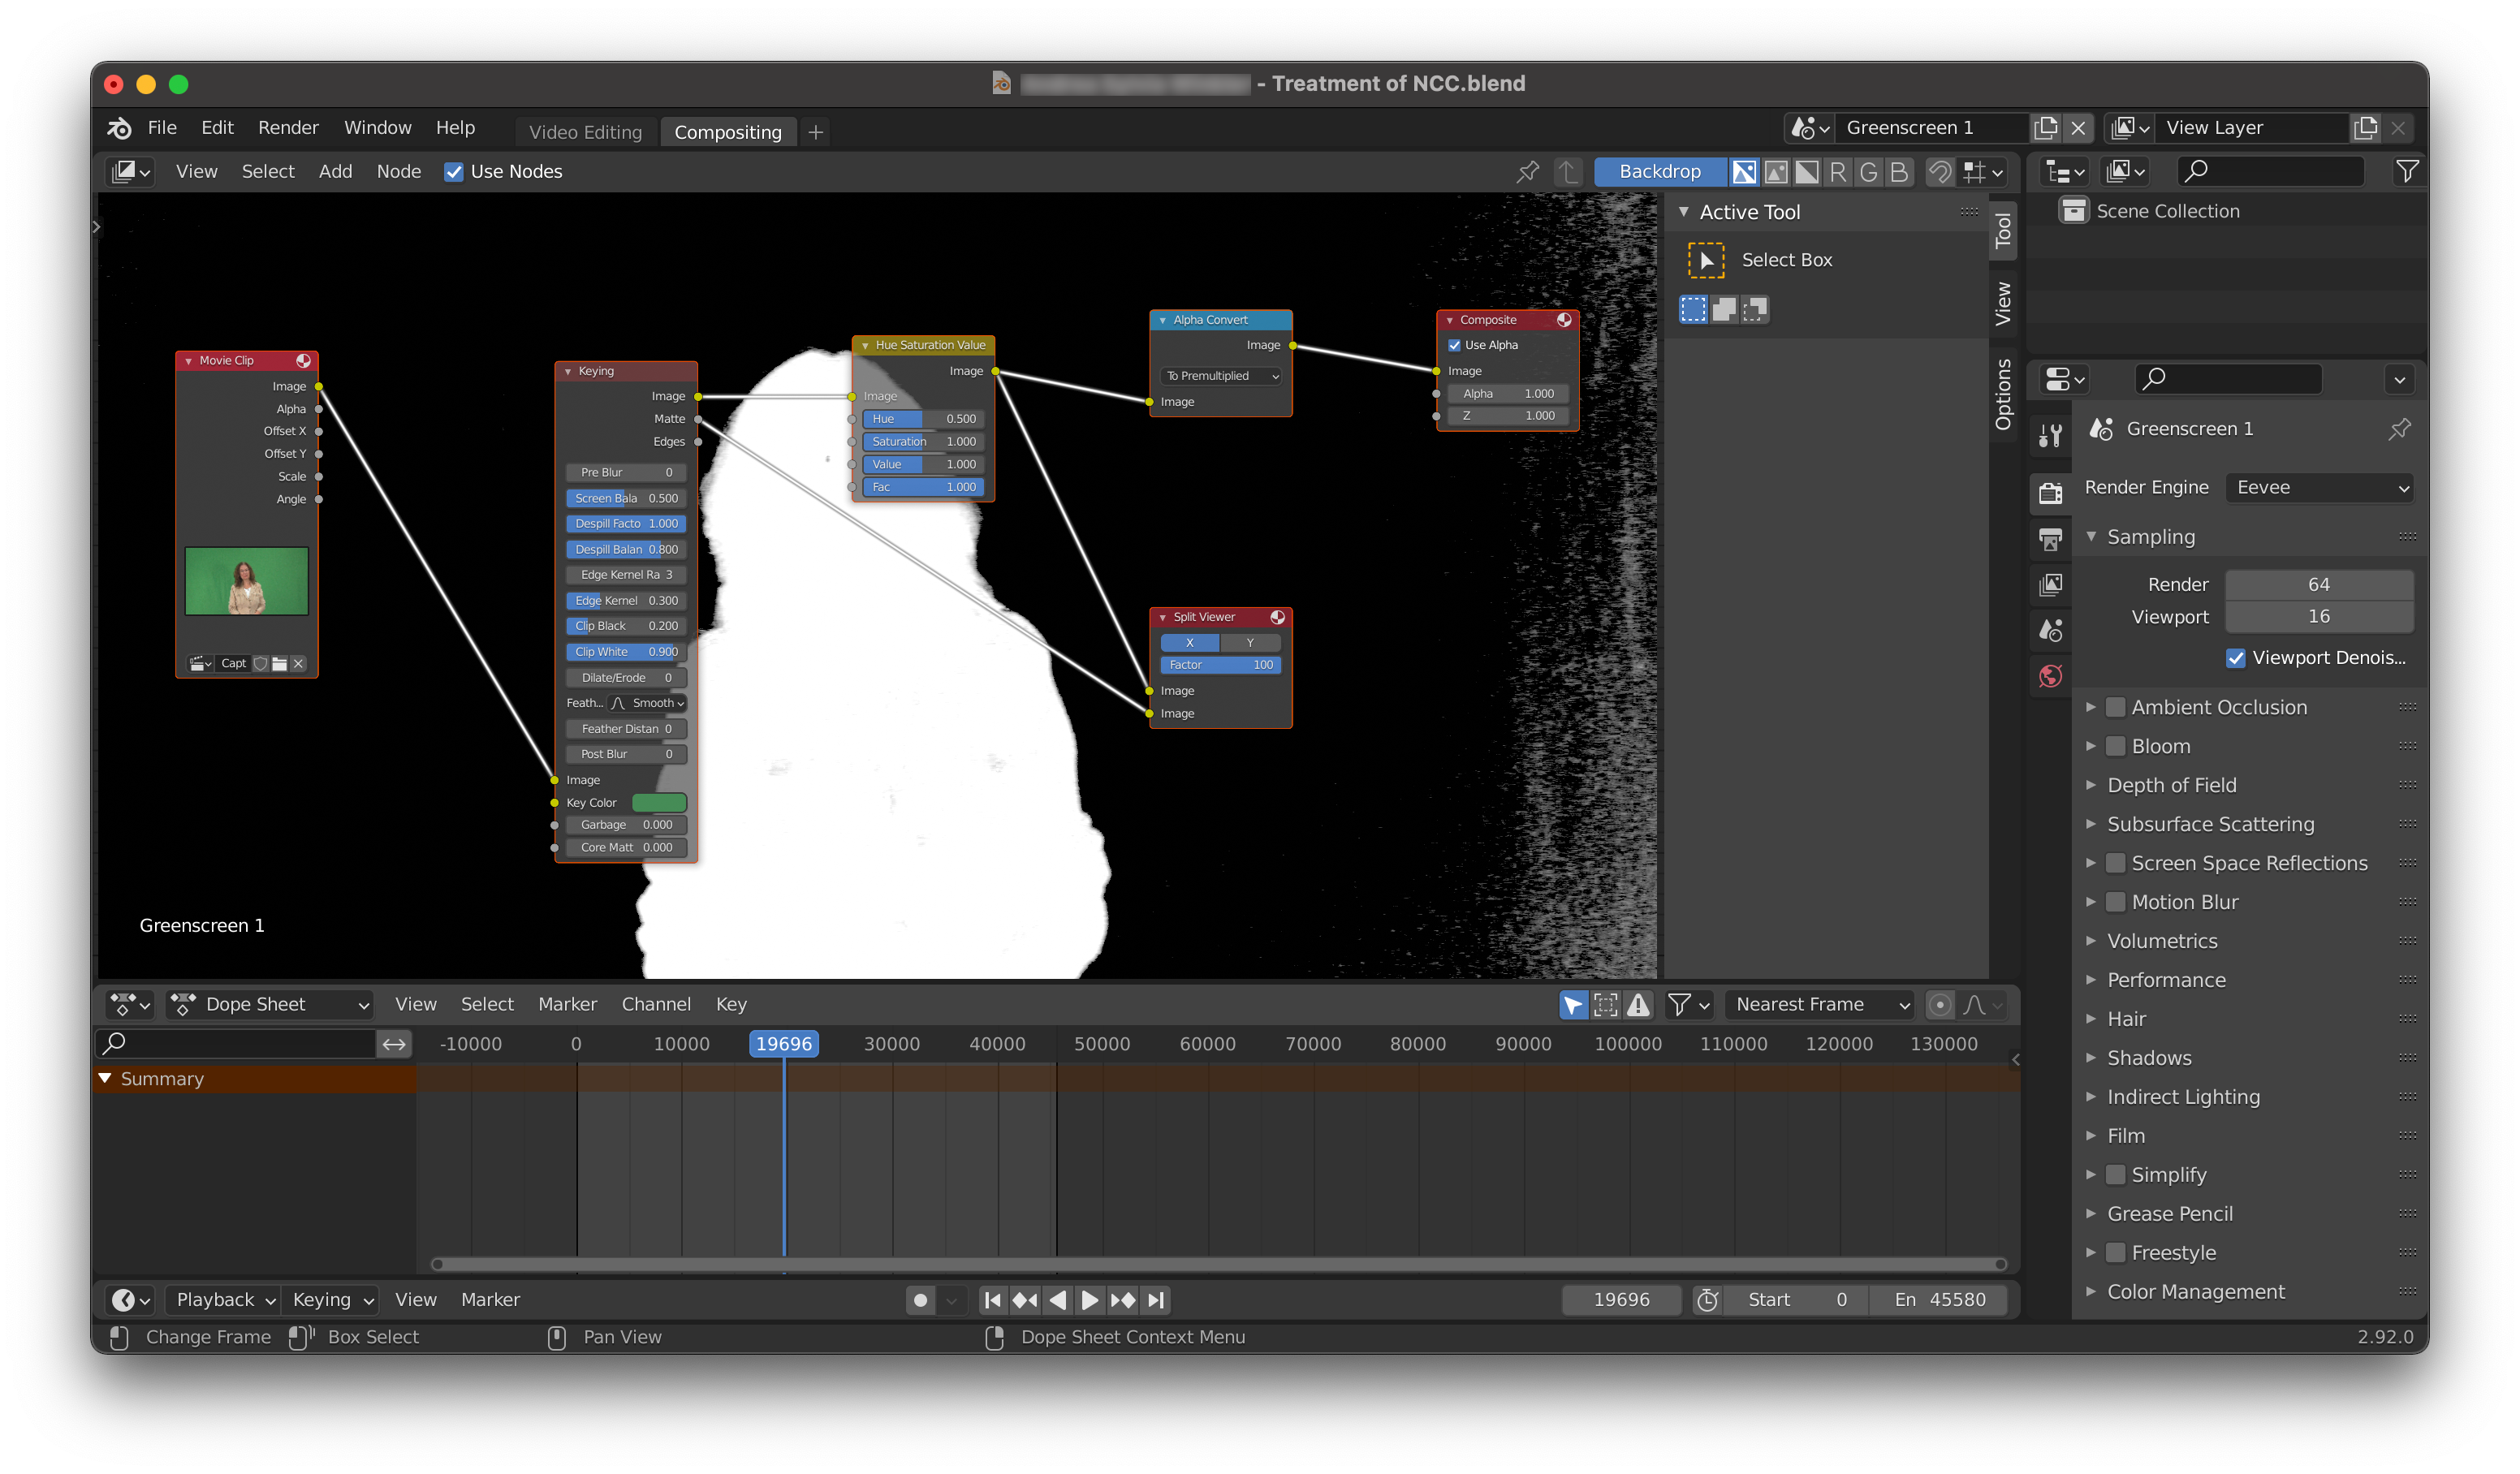
Usually, such issues do not lead to that area of the green screen to be visible in the final video. But they do lead to a strange green shimmer in the final video. There are different ways to address this issue:
In this particular case, you can simply ignore the issue. The area, where the green screen processing is erratic, is so far from the speaker, that it will simply be cropped in the final video
You can try to sample the color at a different place or a different frame.
Or you can slightly increase the Clip Black setting. This increases the detection threshold for the background recognition, below which everything is considered to be part of the background. Be gentle with this setting, because large values can lead to parts of the speaker to be removed from the video, too.
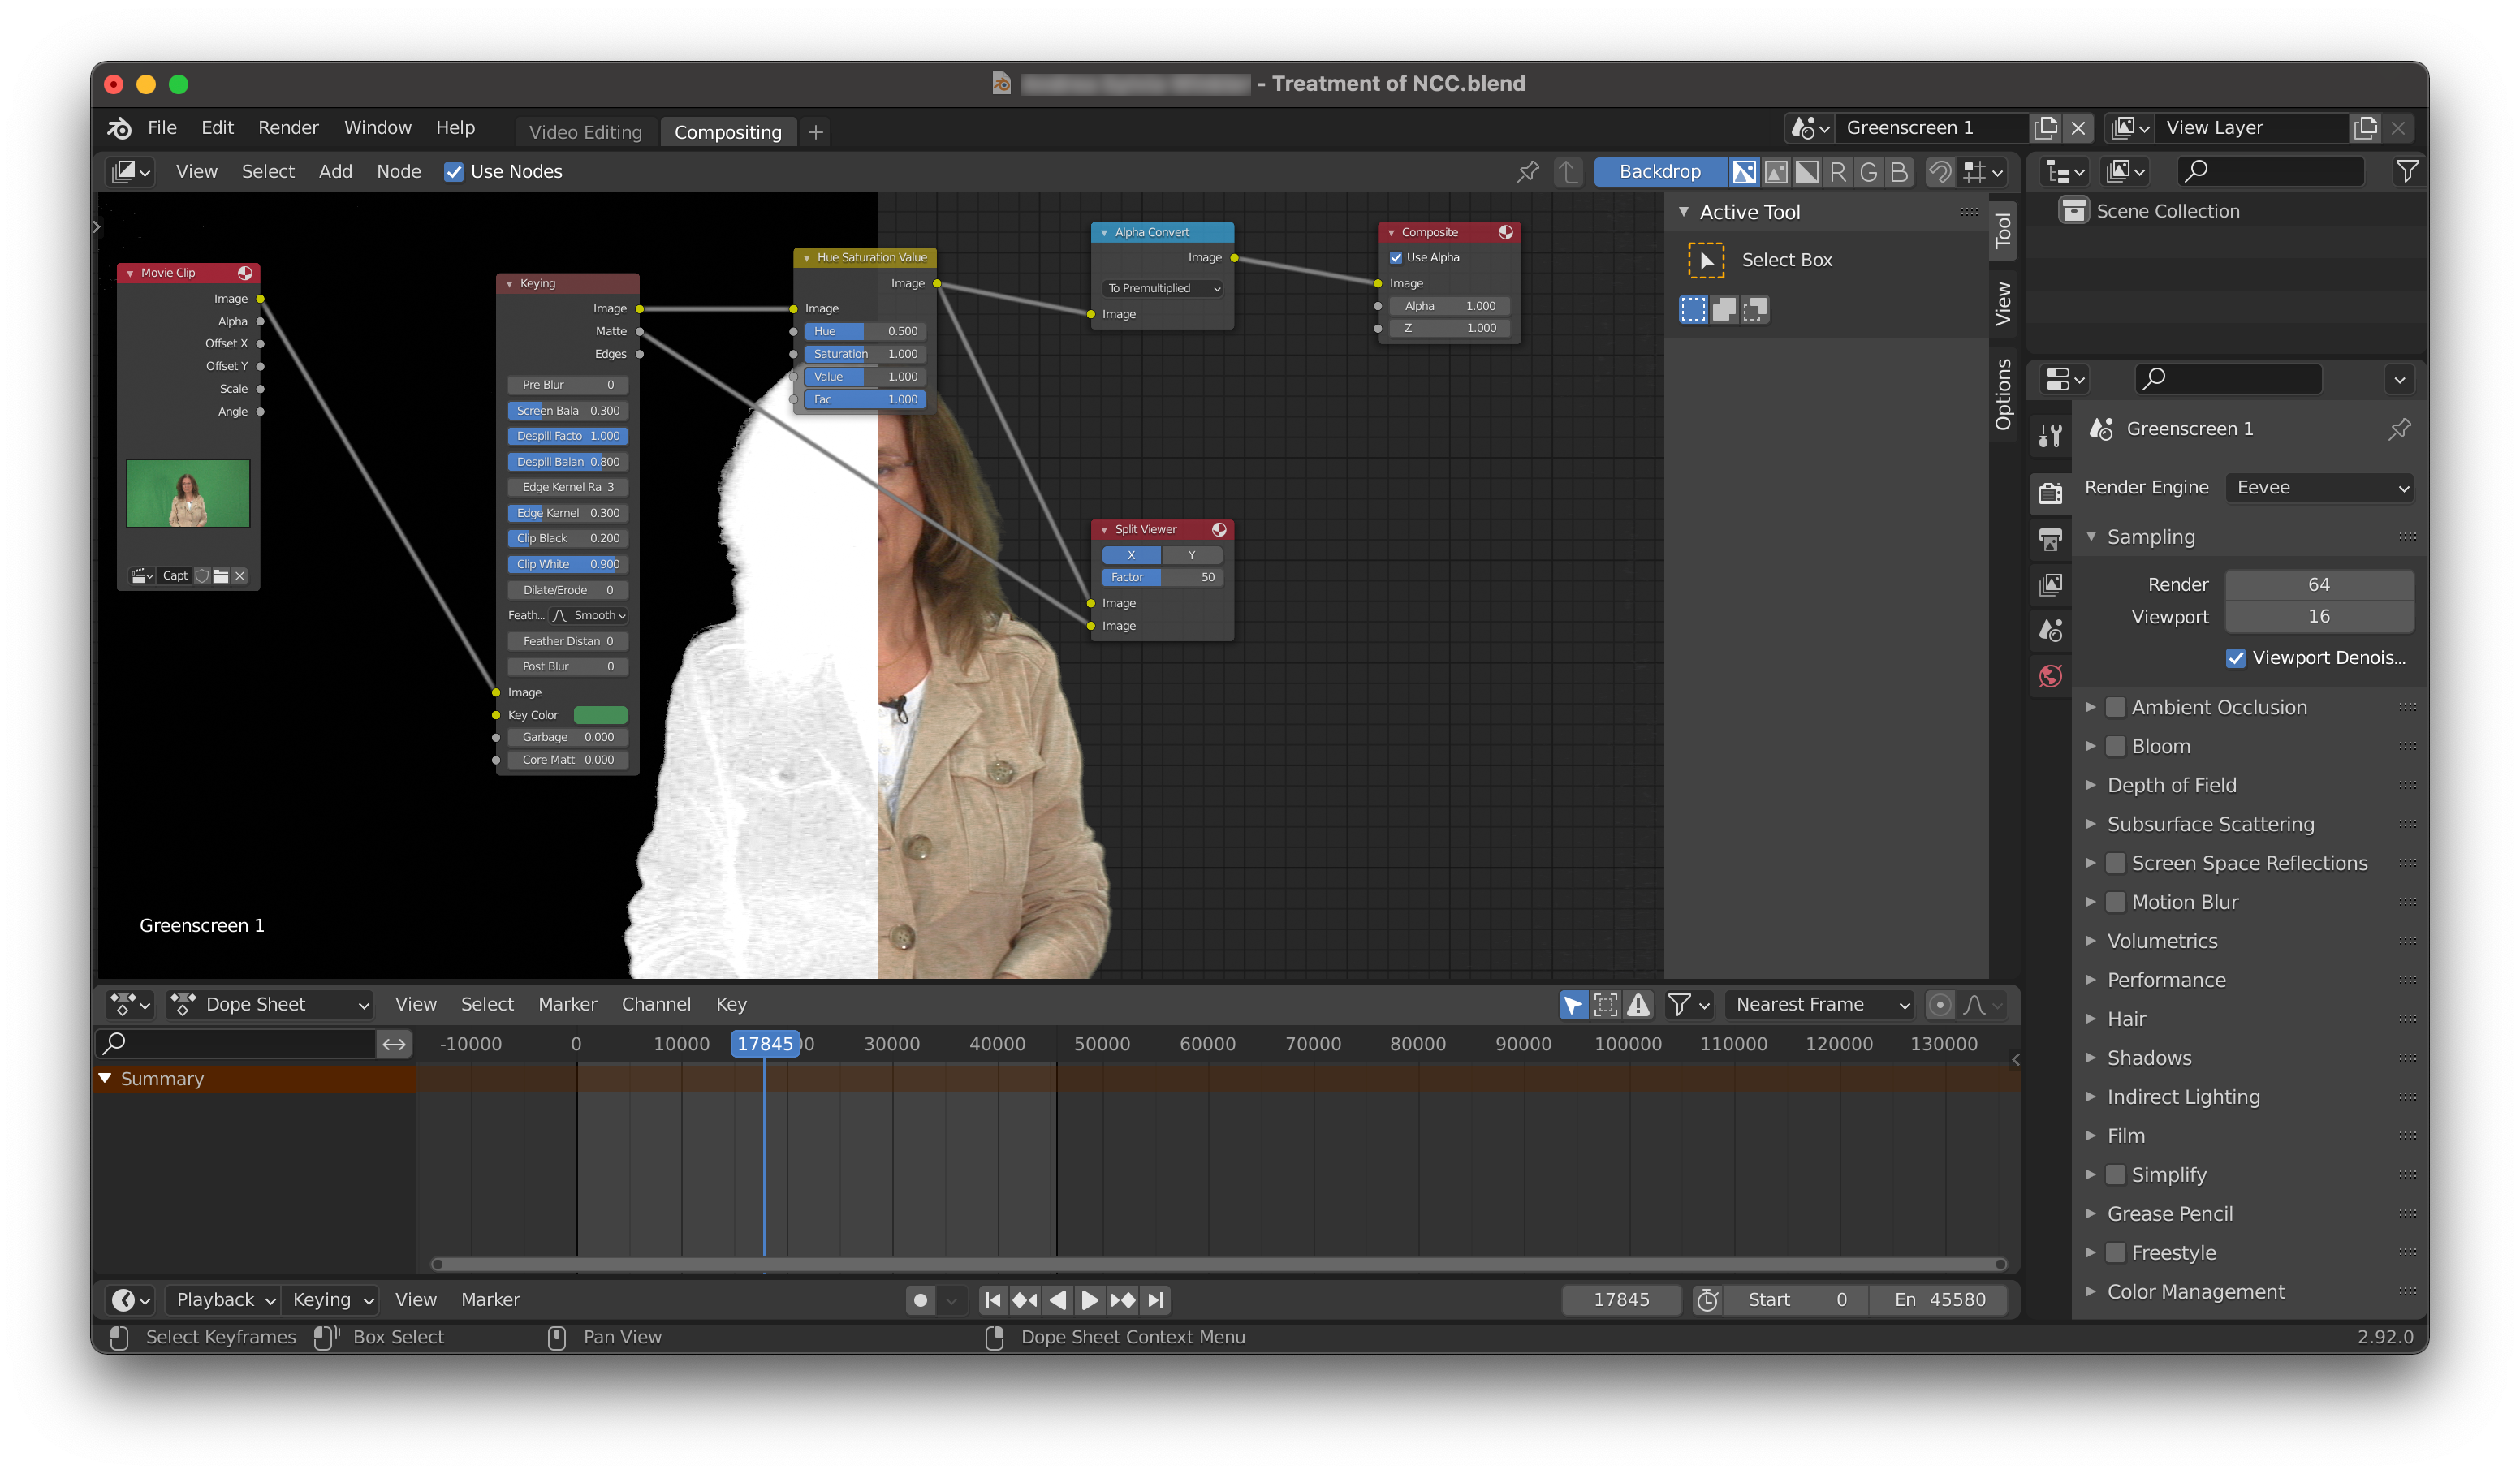
Another issue is demonstrated in the following screenshot.
You can see, that the speaker’s blouse is not entirely white in the mask and in the preview of the resulting image, you might notice a strange marble effect on the blouse.
In this screnshot, the Screen Balance setting was reduced to make the effect more visible in the still image.
With the default value of 0.5, the issue is hard to see in the preview, but in the resulting video, the blouse featured a peculiar glitter effect.
In a way, this issue is the opposite of the previous issue, as some of the speaker is misclassified as background by the green screen processing. This can happen with light clothes, especially if they are green(ish) or yellow. You can address this issue by increasing the Screen Balance setting and/or by reducing the Clip White setting. The Screen Balance setting affects the sensitivity of the background recognition, while the Clip White setting specifies a threshold for the background recognition, above which everything is considered to be part of the foreground. Be careful with low values of the Clip white setting, because this can lead to parts of the green screen being calssified as the foreground. While the Screen Balance can have a similar effect, it seems to be less prone to causing issues, even when maxed out.
And finally, when you look at the preview image in the following screenshot, you will notice, that the speaker has some kind of green aura. This is most prominent around delicate geometries like the speaker’s hair, but you can also find it around her clothes.
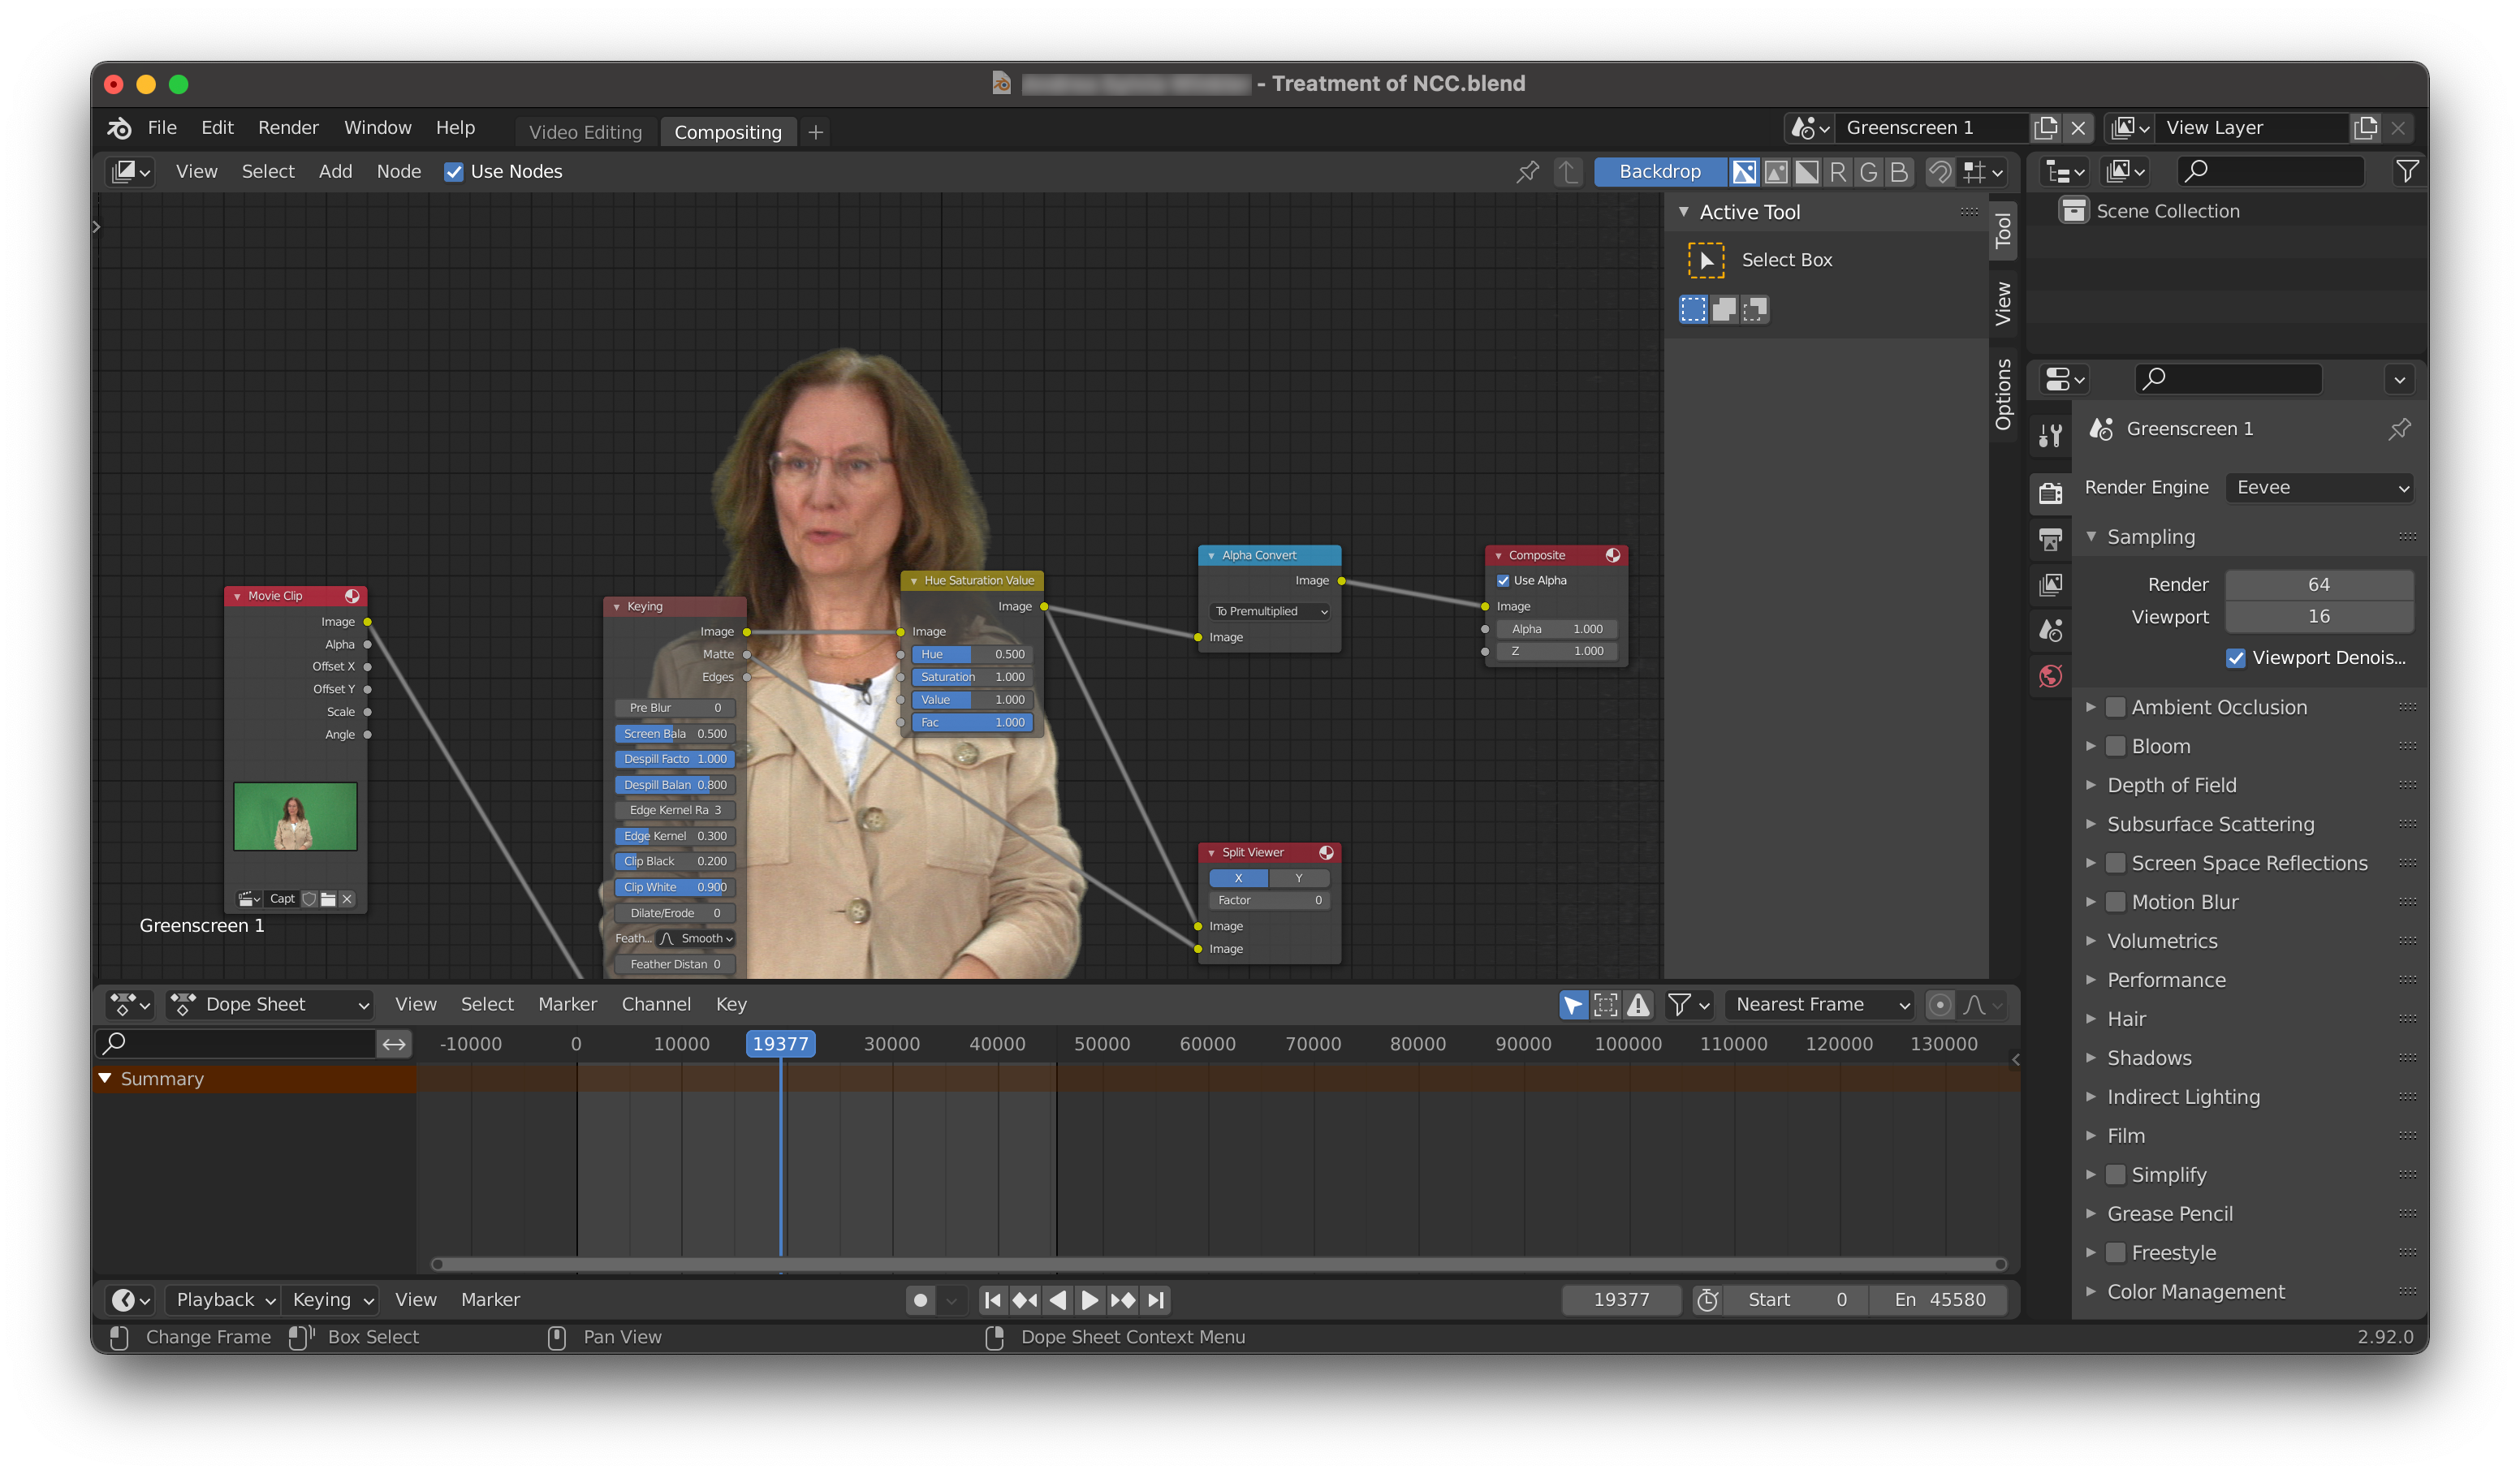
This is caused by the fact, that especially for complex geometries like hair, the processing algorithm has a hard time to find a contour, that separates the foreground from the background. You can influence this behavior with the Dilate/Erode setting, where negative values make the algorithm more audacious when cutting away the background. While small negative numbers can be useful to reduce the green aura effect, you should not go too far, because this will lead to cropping the speaker in a way, that reduces the complexity of their contour. With excessive cropping, the speaker will look like a low-polygon player-model from an old computer game. Also, the green aura is far less visible in the final video than it is in the preview image.
Adjusting the color
Blender.LectureEdit automatically sets up a Hue Saturation Value box in the processing chain for the green screen video. This is, because in naturally colored videos, the speakers often look pale in front of their colorful slides. You can compensate this effect by slightly increasing the saturation. Sometimes, a tiny reduction of the Value setting leads to a darker image, that looks better in front of the slides.
Before the Hue Saturation Value box, there is a Color Correction box, whose processing is disabled by default. Sometimes, it is necessary to adjust specific colors in the speaker video, which is possible with this processing step. An example for this is a recording, in which the white balance failed, which led to a blue tint in the speaker’s normally black hair. This issue could be mitigated by enabling the processing of the blue color channel in the Color Correction box and reducing Gain and Saturation in the Shadows of that color channel.
If you combine multiple videos of the speaker for a lecture, make sure, that the color adjustments are compatible.
Saving the settings
After configuring the processing of the green screen video(s), it is recommended to save your progress by running the command
>>> automation.save_greenscreen_scenes()
Optimizing the performance of the green screen processing
The many processing steps for the green screen video significantly impact the rendering time of the output video. Depending on their settings, some of the processing steps do not influence the resulting video and their boxes in the compositing view can be removed to speed up the rendering. The following command checks the settings and removes the boxes, which do not have an effect:
>>> automation.optimize_greenscreen_processing()
It also sets a configuration parameter, so that re-running the automation.setup() command does not bring back the deleted boxes.
If the deleted processing steps shall be reintroduced, the configuration parameter has to be reset by editing the configuration file greenscreen.json in the Intermediate directory.
In this situation, set the optimize parameter from true to false.