Processing the audio
Exporting the rough audio track
The rough, unprocessed audio track for the lecture can be exported in the Cut scene. For this, select Render in the main menu and then Render Audio…. Blender.LectureEdit has some requirements on how this file has to be saved:
It has to be in the
Intermediatedirectory and it has to have the file namerough_audio.wav.It has to be a wav-file, so make sure to select the container wav in the dialog on the right.
The samples have to be encoded either as 16bit or as 32bit integers, so make sure to select either S16 or S32 as the format.
Note
The limitation to a 16bit or 32bit wav-file is due to the built-in wave library, that comes with Python. Blender.LectureEdit uses this library, so it does not rely on any external software, that does not come with Blender.
Normalizing the audio
Blender.LectureEdit has rudimentary functionalities for audio processing. These comprise a loudness normalization and a high-pass filter, that can be used to attenuate some unwanted booming or rumbling in the recording in order to improve the intelligibility of the speaker. The loudness normalization compensates both loudness fluctuations within a single lecture and differences in loudness between separate lectures.
Note
You can skip this step. If you do, Blender.LectureEdit simply uses the rough audio file, that you have just exported.
Note
You can also use external tools for this.
Simply save the result as lecture_audio.wav in the Intermediate directory.
External tools are likely to provide more features and their processing will be much faster.
However, it is probably more manual effort to configure all the processing steps in an external tool, so if you are happy with the built-in features of Blender.LectureEdit, it might be the fastest to simply use it.
After saving the results of cutting the lecture, there is a file with the name audio.json in the Intermediate directory.
You can edit this file to configure how the audio processing shall be performed.
Make sure that you only change the values in this file and not any of the punctuation or the names of the settings, because otherwise the file cannot be read by the software.
The most important setting is the channel setting, with which you select, which channel of the rough_audio.wav file shall be taken as the audio track.
In a stereo file, 1 is usually the number for the left channel, while 2 refers to the right channel.
The second most important setting is the list of highpass_frequencies, which controls below which frequencies the audio shall be cut off.
Having a single filter at 100Hz is a sensible default for this value, but if the audio track is still boomy after processing it, you can increase this frequency.
For a female speaker, it is often possible to go up to 150Hz or even 200Hz without loosing any sound quality in the speech, while significantly attenuating the low-frequency background noise.
Alternatively, you can add more high pass filters by specifying multiple frequencies.
You can specify the same frequency multiple times (e.g. [100.0, 100.0]).
This will lead to a sharper roll-off of the low frequencies at the expense of a longer processing time.
If the list of frequencies is empty (empty brackets []), the high pass filtering is disabled.
Similarly to the highpass filtering, the audio processing offers the functionality to attenuate certain frequencies. This can be useful to remove disturbing noises from the recording, such as humming due to ground loops or power supply interference. Since the attenuation of certain frequencies comes with a slight degradation of the perceived quality of the speaker audio, this feature is deactivated by default. See the Fixing a noisy recording section, if this feature shall be used.
The other settings require some background information about how the audio processing is implemented and are described below. Usually, it should not be necessary to adjust them.
After the audio processing is configured, the process can be started with the command
>>> automation.normalize_audio()
This process takes some time and don’t worry, if Blender is unresponsive while the normalization is computed. On a Apple MacBook Pro from 2019, the audio normalization takes about half as long as the length of the lecture.
Technical Background
Note
If you are not intersted in the technical details and how to fiddle with the remaining settings in the audio.json file, you can skip this section.
The processing pipeline of the normalization looks as follows:
digraph AudioProcessing{ input [label="read rough_audio.wav", shape=parallelogram]; highpass [label="high pass", shape=rect]; notchfilter [label="notch filter", shape=rect]; aweighting [label="A-weighting", shape=rect]; envelope [label="envelope computation", shape=rect]; level [label="level computation", shape=rect]; normalization [label="normalization", shape=rect]; limiter [label="limiter", shape=rect]; output [label="write lecture_audio.wav", shape=parallelogram]; input -> highpass -> notchfilter -> normalization -> limiter -> output; notchfilter -> aweighting -> envelope -> level -> normalization; }The high pass filters are always second order Butterworth filters. To emulate higher orders, you can specify more frequencies for the high pass filtering. The notch filters are also second order filters.
You see, that after the high pass and the notch filtering, the signal flow is split into two paths, one of which contains several processing steps to compute the level. This level is then used to adjust the loudness of the audio in the processing step, that is called normalization in the graph. After that, a limiter is applied to make sure, that none of the audio samples has a larger value than what can be saved in the resulting audio file.
The A-weighting attenuates those frequencies, at which the human hearing is not particularly sensitive. By having this before the level computation, the resulting level is closer to the loudness, that is perceived by humans, than a purely technical level value.
The envelope can be imagined as the contour of the wave form, with which Blender and other programs visualize the activity in their audio tracks.
Here, it is used to detect, whether the speaker is talking or not, so that only the active parts of the audio are considered for the level computation.
This prevents undesired boosts of the level after the speaker has paused.
The level_threshold setting specifies the minimum amplitude of the envelope, that is considered to be active speech.
Its value is in dB with respect to the currently determined level.
The target_level specifies the level of the audio track after the normalization in dB[FS].
The default value of -20dB means, that the normalization adjusts the level in a way, that 20dB of headroom for transients with a high amplitude.
The level_smoothing is a time in seconds, that roughly corresponds to the timespan, that is considered for the level computation.
A shorter time here will lead to the normalization of shorter loudness variations, while a longer time leaves more of the speakers dynamic intact.
10s seems to be a good compromise, that ensures a consistent loudness during the lecture, while still allowing the speaker to emphasize certain words by speaking a little louder.
Every amplitude, that goes beyond the value range, which can be represented by the resulting file, is reduced by the limiter.
The headroom parameter is a value in dB[FS] over which none of the signal’s amplitudes must go.
Having a small negative value here, allows for some numerical inaccuracies without breaking the output file.
With larger negative values, a lot of the possible fidelity is lost, while with positive values, the limiter no longer prevents values, that are impossible to store in the output file.
While it is possible to simply reduce all values above the allowed threshold to that threshold, this causes audible distortions.
This is why the limiter looks ahead into the audio stream and reduces the level gradually whenever a high amplitude transient would exceed the allowed range.
The parameter limiter_lookahead specifies how much time in seconds, the limiter shall look ahead.
Longer times allow for a more gentle adjustment of the level, which reduces the resulting distortions.
On the other hand, excessively long lookahead times can lead to weird sound effects, in which subsequent transients modulate the level of the signal.
The default value of 25ms is usually plenty to avoid audible distortions.
The resolution specifies how many bits are used to represent an audio sample in the resulting file.
The default value of 16bits is identical to the value, that is used in an audio CD.
You can increase the value to 32bits (only 16 and 32 are allowed) to increase the fidelity of the resulting file.
However, this will double the size of the file and the effects will almost certainly be inaudible.
Fixing a noisy recording
A perfect cleanup of a noisy recording is usually not possible. Therefore, it is strongly recommended to ensure a high audio quality by making test recordings and check them before recording the actual lecture. Removing noise leads to an audible degradation of the audio quality. However, sometimes it is required to make the best out of an impaired recording, which is why Blender.LectureEdit has a feature to remove selected frequencies from the audio track of the recording. This alone may not be enough to have an acceptable audio quality, so the audio track has to be processed with external tools afterwards.
There are two parameters in the audio.json file, that allow to filter out certain frequencies:
The parameter
notch_filter_frequenciesallows to specify a list of frequencies, that shall be attenuated. This list has the same format as the one for the high pass frequencies: Numbers without units, separated by commas and grouped by square brackets (e.g.[50.0, 150.0, 250.0]). Empty square brackets disable the attenuation of any specific frequencies. The longer the list of frequencies is, the more time it takes to process the audio file.The parameter
notch_filter_q_factoradjusts how strong and narrow the attenuation of the listet frequencies shall be. It has to be a positive number. High values result in a strong attenuation in a narrow frequency range, while low values make the filter affect a broader range of frequencies with a less severe attenuation.
(Source code, png, hires.png, pdf)

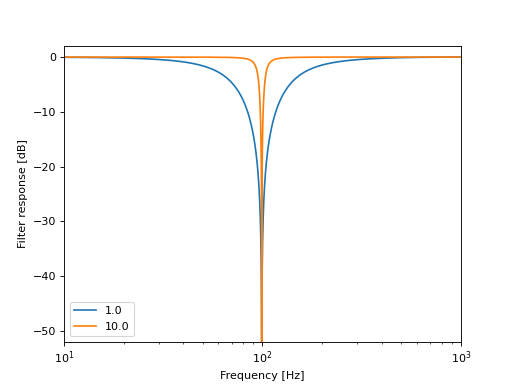
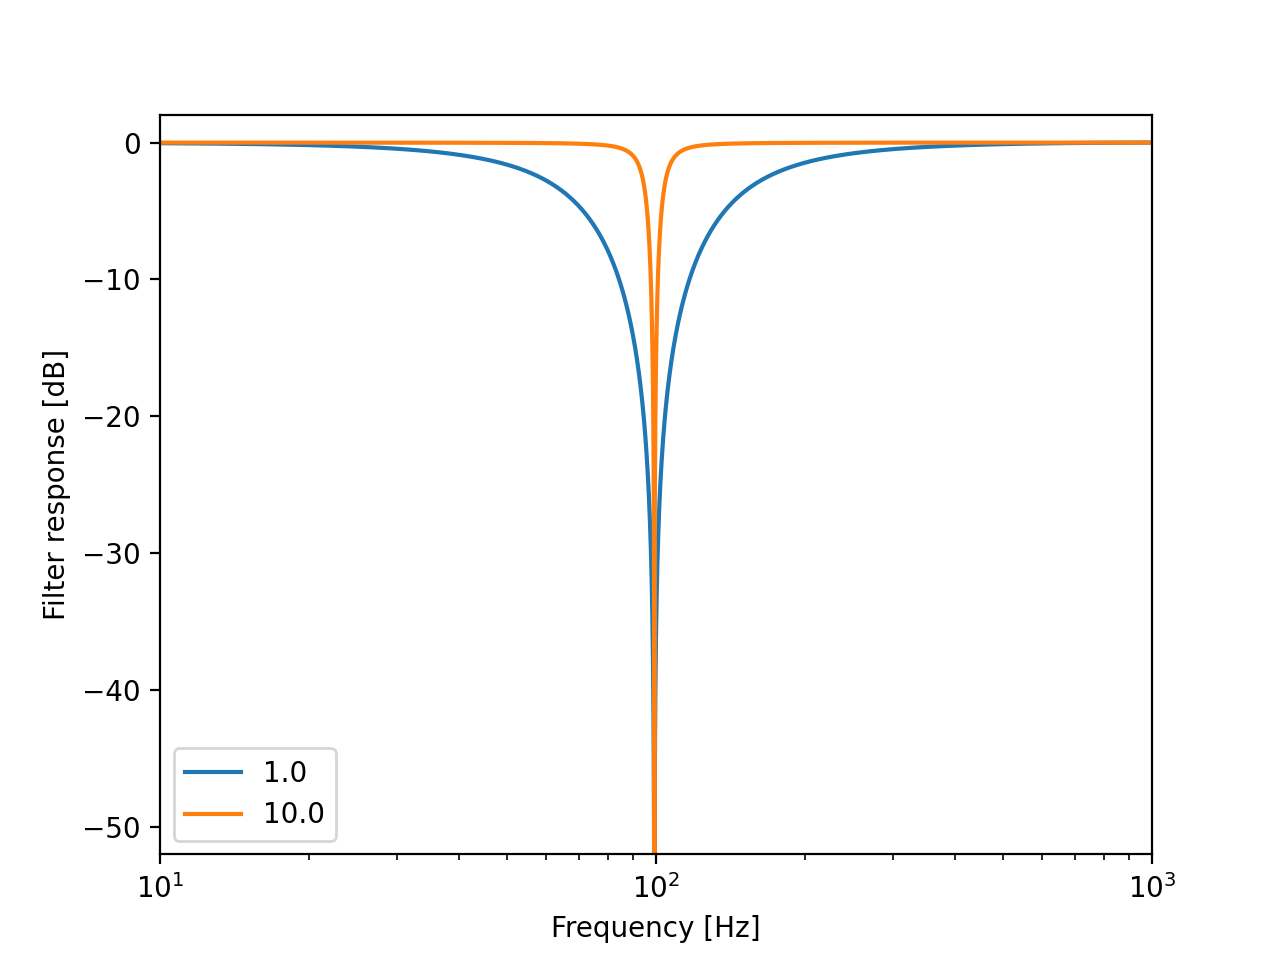
The plot above shows the frequency responses of a relatively wide notch filter with a Q-factor of 1.0 and a narrow notch filter with a Q-factor of 10.0.
When filtering out noise, it is often necessary to not only attenuate the base frequency of the noise (e.g. 50Hz or 60Hz for interference from the power grid), but also its integer multiples. For certain noise sources, the odd order harmonics (odd integer multiples of the base frequency) make up a significant part of the noise interference, while the even order harmonics can be ignored.
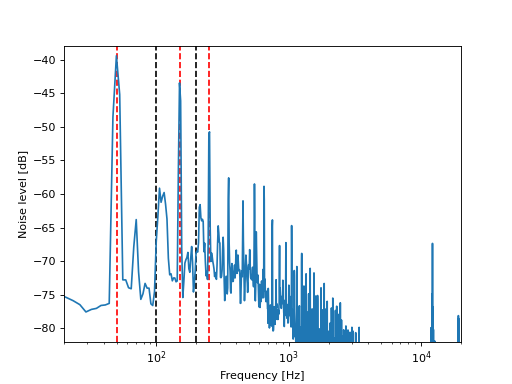
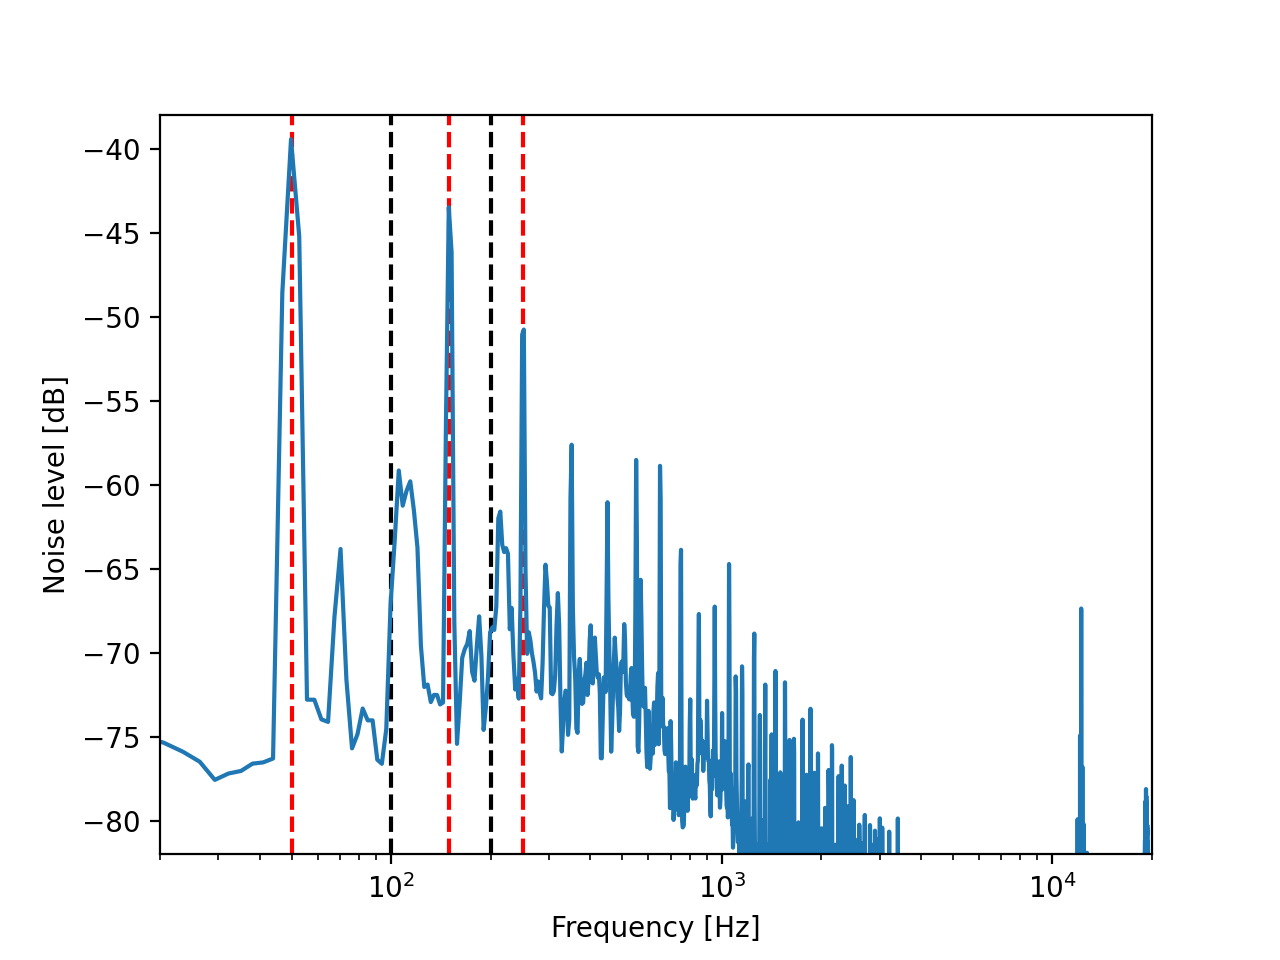
This procedure is illustrated by a real example from the online course, that has been developed by the CYSTINET-Africa project. The following plot shows the spectrum of the noise, that was present in one of the lecture recordings.
(Source code, png, hires.png, pdf)

The peaks at 50Hz, 150Hz and 250Hz, that are marked by the red, dashed lines, indicate, that the problem in this recording was interference from the power grid. Like often with such interferences, the even order harmonics of the power grid frequency at 100Hz and 200Hz are not particularly problematic (see the noise level at the black, dashed lines).
In this case, the notch_filter_frequencies parameter was set to [50, 150, 250] to filter out the respective frequencies.
Since the peaks in the noise spectrum are quite narrow, a relatively high Q-factor was chosen by setting the notch_filter_q_factor parameter to 10.
While this technically removed the largest part of the noise, the perceived quality of the audio was actually degraded. The reason for this is, that the noise also contains a lot of high frequency content (note the many peaks at higher frequencies) and cutting away only the low frequencies made the noise sound fizzy and more annoying. It was attempted to add more notch filters to cover also the higher frequencies, however this led to a substantial degradation of the speech quality. In the end, a hybrid solution was applied, where the filtered signal was post-processed with the noise attenuation plugin in Audacity. Here, it was worth the effort to experiment with the settings of the plugin thoroughly, because the default settings made the recording sound rather muffled.